Sunday, September 3, 2023

Talk about your art! by Regina Marzlin

Field Notes 1-20

In the fall of last year, I drove to a small art gallery about an hour's drive away from my home to see an exhibition. The work shown was by a Nova Scotian painter and printmaker, Bob Hainstock. I admire his abstracted landscapes and his use of colour. While I was looking at the exhibited pieces, I got talking with the gallery owner. We had a very nice chat about the artist's work, what I admired about it and how I thought it related to my own work. She asked a lot of questions about my own work, not having heard of me before. 

My visit took an unexpected turn right there! She asked me if I was interested in showing in her gallery in the next year, and basically offered me a solo show on the spot. I was very surprised and agreed, of course. The space is great, it would be wonderful to have the whole gallery to myself and fill it with my art. I drove home with my head spinning, and wondering if it all would work out. The gallerist really hadn't seen my art at all, so I just hoped she wouldn't renege on her offer.

Fast forward one year, and my exhibition opened on August 28th, 2023. I'm very happy to have this opportunity to see this body of work in one room, and for other people to get to know my work as I hadn't shown in this area of my province so far.


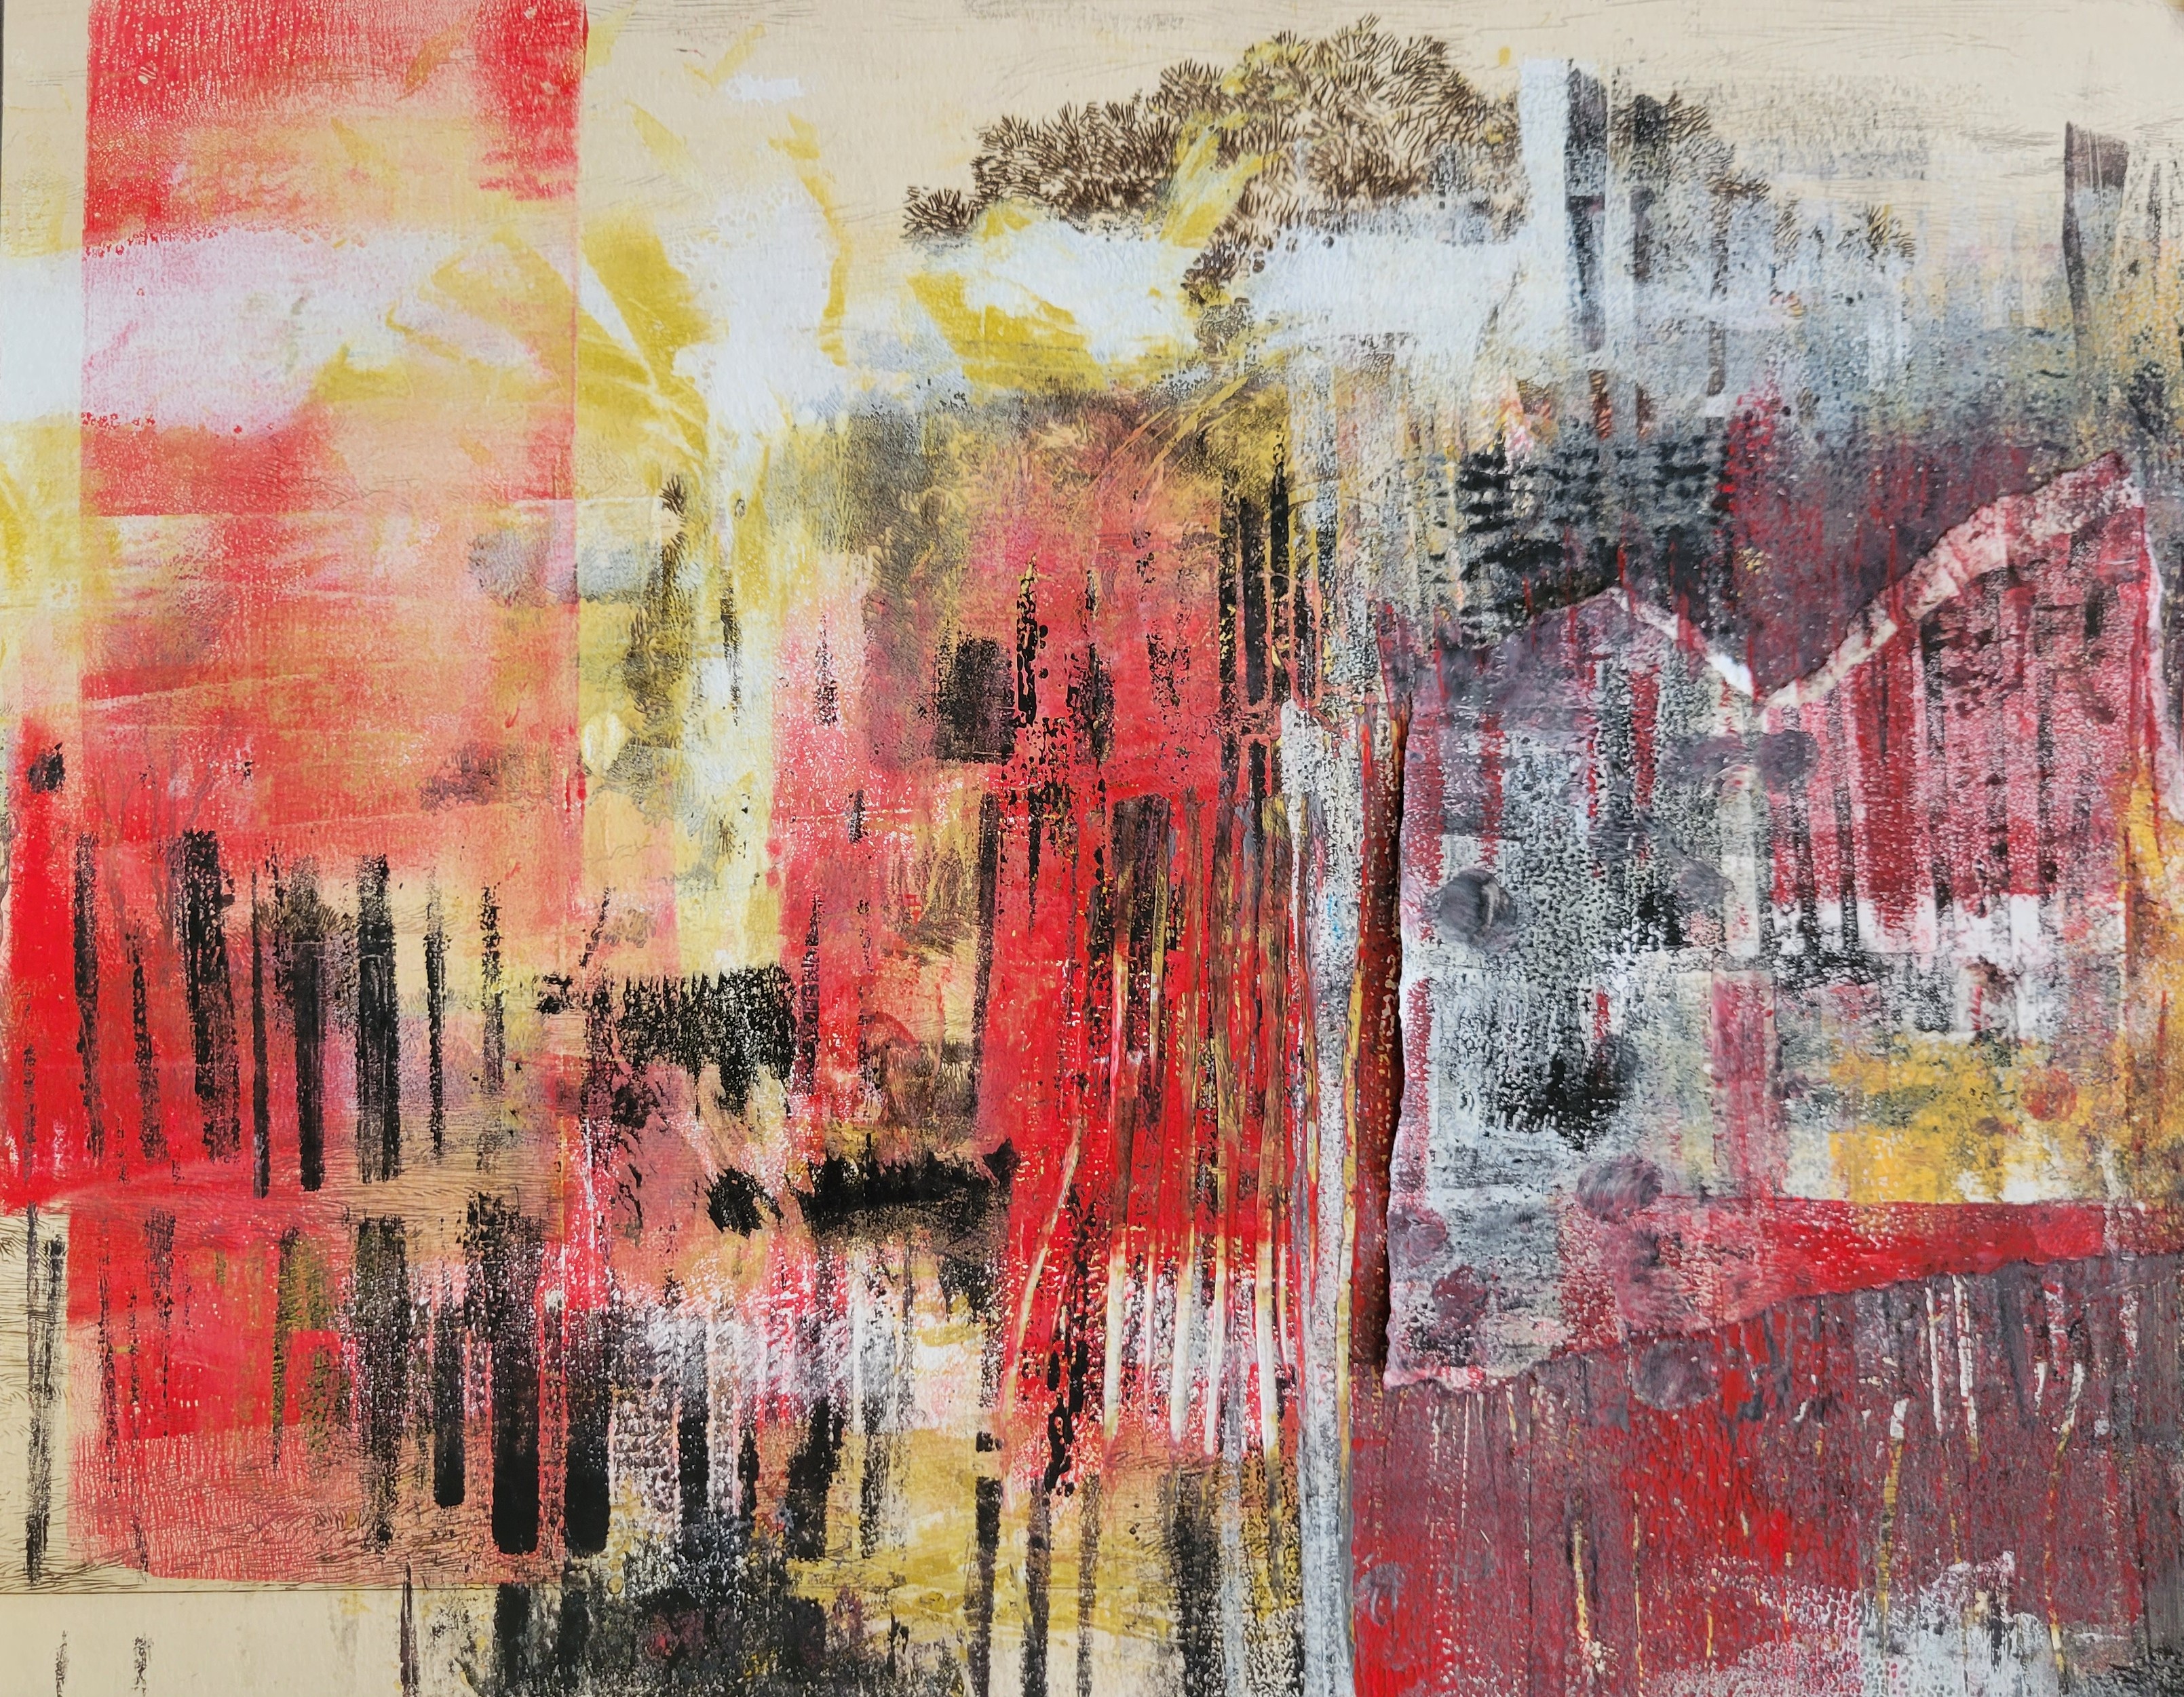
The body of work I'm showing has been made during the last four years and mainly consists of stitched collages made with my monoprinted fabrics. These prints are made with natural material that I collect and is a snapshot of my immediate surroundings. The title of the exhibition is "Field Notes", referring to the character of a botanical expedition and exploration of the nature around me. 

I will also teach a class about mono printing with natural materials at the gallery, to tie in with the exhibition.

It is important to have some engaging words at the ready to talk about your art, to describe it to people even without the help of visuals so they can get interested in what you do. You never know where this will lead!

Field Notes: Hidden Away


 Regina Marzlin "Field Notes", August 28th - September 23rd 2023, Visual Voice Fine Art, Truro, Nova Scotia

To see all pieces in the exhibition, go to

Visual Voice Fine Art | Unique Works by Talented Artists (visual-voice.ca)


Monday, August 21, 2023

Creating a Video About Your Artwork by Barbara Schneider

 I was asked as an artist in Quilt National 2023 to create a 5-7 minute long video about myself as an artist and the creation of the art work. The QN staff were great about giving direction as to how to set it up and what information to include. I was not thrilled at the prospect but decided it would be a good thing to do. In the end it was not hard to do and I encourage everyone to try to make one about your work and share it with the ACN  group!

Here was what I did and how I went about it.

I decided on a background that would not be distracting and that had good light. This turned out ot be in my dining area with my Chinese chest behind me and good light coming in the patio door. I moved the dining table back so I could stand in front of the chest.

I set up my I-phone (AKA camera)  on a stack of books until it was the right height to record me talking and showing things.  This meant moving the table back some more and adding lots more books to the stack. :-) I got various props (Fosshape samples, original inspiration wood fragment, etc, organized in front of me on the table so they were at hand. I chose something plain to wear.

I reviewed the questions they wanted answered and wrote my self a short list to have nearby to refer to if needed.

I chose a time of day when there was no lawn mowing or outside noise coming in. I made sure the nearby refrigerator (ice-maker) was off so it wouldn't suddenly start making loud noises. I made sure my husband was out of the house so I wouldn't be nervous :-)

I was ready!  I got the camera turned the right way, checked that I was recording loud enough, checked that I was speaking to the camera. I looked at that, got over the freakiness of watching myself, took a deep breath and went for it.

I went straight through. I watched it and tried to be not too hard on myself.  It was within the timeframe, I covered most things, I didn't stumble too much and I decided I was done! Quilt National gave me a Dropbox site to send it too and that was easy.  

So a lesson learned and now I have that  in reserve if I need it for anything in the future. 

Here were some of the questions I had as prompts.

 Quilt National Suggested Talking points:

Share anything you think is important, unique, or compelling about your artwork! 


Introduce yourself. What's your name? Where are you from? 

What compelled you to make this artwork? What led up to its creation? 

Was this quilt part of a series?

What is your background in art? What is your background in quilting?

Where do you find inspiration?

What references did you use in creating this artwork?

What techniques did you use?

Did you problem-solve along the way? How so?

What makes this artwork unique?

And this is a link to the Quilt National video.  Russ Little and many other artists you might want to learn more about are there as well.

 https://www.youtube.com/watch?v=wDqheAjsgg0


Saturday, August 19, 2023

Curating an Exhibit at The Eddie Rhodes Gallery by Connie Tiegel

 In order to hang a show at a gallery a lot of information needs to be gathered. Visiting the gallery helped me to measure the linear feet of the walls, get a feel for the layout of the space available to hang work including walls, ceiling, floors, vitrines, lighting, etc. I made a map of the space using compass points to orient me. This helped me tremendously when placing pieces to show most effectively.

The next set of facts needed was the size of individual pieces to be hung in the show. I got this information from the artists and the catalog that had been put together by Mary Ellen Latino.

 I identified the walls as compass points, divided up the linear feet of each wall to determine how many pieces could fit with how much space between each piece. I used kraft paper as my substrate for its sturdy quality and easy rollability.

 I calculated the size of each work at 1 inch =1 foot and drew/cutout a piece of kraft paper for each piece. I laid out the colors of the pieces on each corresponding shape and began to play with a layout for the gallery. I continually worked with size, color and how well the pieces talked with each other until I was pleased with the layout. I kept in mind that I wanted about 3 feet between pieces so there was room for labels on the wall. Consistency was important for this.


Saturday, August 12, 2023

This Year's Flags by Connie Tiegel

  Every year I make 3 artcloth flags to fly in my back yard. I began more than 20 years ago after a trip to Bhutan where there were large flagpoles everywhere with long vertical flags flying to catch the wind and disperse prayers to the universe. I was captivated by the idea and when home again decided to carry that idea into my backyard and life. When making the flags I reflect on world situations or events close to home. 

This year I am thankful for all the rain we received during the winter, even though the storms did damage to much property and lives. The winds destroyed two of my flag poles and shredded two of the three flags. I intentionally leave them up in the winter to watch the effects on silk. Usually the silk lasts well through the winter and when I replace the old flag with the new, I wash the old flags, cut them into strips, braid the strips into l ropes then wind the ropes into very large balls. I have used the balls in photography books I make. 

This May I shibori dyed 3 separate 3 yard pieces of silk charmeuse with 3 color schemes: yellow/green, red/purple, and blue /violet.

On the first flag I stamped on a full surface design, (same stamp over the whole piece). This gave a cohesive background and suggested a bold foreground. I finished with applique of large flower petals. The second flag I used some branches from the garden and a gelli plate to make the background and added gold foil to sparkle in the breezes that blow every afternoon.  Butterflies and bees were stamped onto the surface of the third flag in gold paint. The flags not only send prayers of thanks to the universe this year for breaking the drought and giving us water but they bring us pleasure throughout the year as we watch them move in response to the wind and sun.


Saturday, August 5, 2023

Sharing time with other artists by Connie Tiegel

 Making a jacket with the jacket queens:

After 4 days of sharing retreat time a small group of retreat participants decided they wanted to do more together during the year. Two of the gals got together and proposed making a simple jacket that would fit all of our figures and look stunning on all of us. We were dubbed the “jacket queens” and eagerly watched for emails that would give us dates to meet and work on our projects. 
The first step was to secure some kantha cloth from which to cut our patterns. Most everyone looked on the internet and found their cloth. I decided to make my cloth from my own stash. I sewed together a bundle of indigo dyed fabrics I was gifted about 20 years ago. For the lining I chose some hand dyed blue silk charmeuse


 Bubble gauze was chosen as the batting so the drape of the fabrics would remain true. I stitched my 3 layers together for a couple of months and finally had a 48 inch by 60 inch piece of layered and stitched fabric ready to cut to pattern.  The “jacket queens” got together to cut out the pattern and plan the sewing, learning new stitching methods, and options for the finished look. I used a combination of machine stitching and hand stitching of French seams to complete my jacket. After 4 months we had a gathering to show off our work. Everyone had approached this same jacket with different ideas and each jacket was distinct to the maker and all beautiful. I happily wear my “jacket queen” jacket to as many occasions as I can.


Tuesday, July 18, 2023

Quilt National Interview

 I was honored to be included in Quilt National 2023. Approximately 80 quilts were chosen for the exhibit which is on display at the Dairy Barn in Athens, OH. The exhibit then travels in various groupings for a couple of years. I plan to go see it in August on a road trip with Mary Vaneecke. 

Meanwhile, I was asked to do a short video explaining my inspiration and process. It is about 5 minutes long. Below the link are a few pictures of the piece. There are several other artist videos on the YouTube site as well.

Here is the link to the video:

https://www.youtube.com/watch?v=wDqheAjsgg0&t=52s


Here is the link to the video:

https://www.youtube.com/watch?v=wDqheAjsgg0&t=52s

Saturday, July 15, 2023

The Art of Seeing and Perception

Monoprint is a special technique that lends itself to the art of ‘seeing and perception.’ I take a monthly workshop led by Candis Cousins at the O’Hanlon Center for the Arts in Mill Valley, CA. We begin with a reading from the founder of the Center, Ann O’Hanlon, from her book “Seeing/Perception, Looking at the World Through an Artist’s Eye.” Then we have a short demonstration of the possibilities of monoprint in which we all participate. It’s a warm-up for the next step which is to go to our individual tables for 2 hours and begin to experiment in a spirit of curiosity and exploration. The process of making a monoprint is quick and engaging. Paint or ink is placed on a plexiglass or a gel plate. Paper is laid upon it and pulled up. A response is triggered. Do I like it? What more does it need? Texture, color, line? An action is required which might include waiting. My attention is riveted. Try another piece of paper. Try incising into the plate … or add a texture both onto the plate and then with the ink on a stencil, press that onto the paper. What happens? Add another layer. Wait, if I add 2 or 3 layers of ink onto the gel plate, let the last layer dry, what will that bring me when I place paper on it? I know all the ink will be pulled up onto the paper, but what will it yield? When is it done?
Now I’m following and listening myself and to the ‘voice’ of the line, gesture, shape, color. Might my next action be a mistake? Try it out! I’m interested in what happens to be there. This is the beauty of the monoprint process.
“When we can look upon A seemingly random work of our own With interest in what happens to be there Rather than what we wish to be there We will encounter the same fulfillment As that experienced On an unknown wilderness trail” Quote from Ann O’Hanlon Recently, I’ve been monoprinting on top of prints inherited from my father from the 1893 Chicago World’s Fair. They provide the substrate and an opportunity to respond first to each print, whether to its line, color, shape, rhythm, gesture, content, or mood. I begin with a layer of complexity and then add my own layers.
Last, we take 2 hours to look at everyone’s pieces. Our task is to look carefully, to find the quality of beauty, surprise, comfort/discomfort, essence in our work and to support the artfulness of each participant. These are the many reasons you’ll find me at the monoprint workshop here in Mill Valley the first Sunday of each month.

Our New Artist Interview Has Dropped


 Click here to read about Barbara Schneider's work in her own words.

Saturday, July 8, 2023

The Art Cloth Network Collaborative Custom Repeat Pattern Workshop


The Art Cloth Network Collaborative Custom Repeat Pattern Workshop

Monday, April 24, 2023 at the Fabric Workshop and Museum in Philadelphia


On Monday, April 24, 2023, the day after our in-person meeting in Philadelphia, seven members of Art Cloth Network got together for a workshop at the Fabric Workshop and Museum. In attendance were Mary Ann Nailos, Ileana Soto, Barbara Matthews, Adria Sherman, Judy Languille, Sherri Lipman McCauley and Regina Marzlin. Together we designed, prepared a screen for printing, set up the print table for repeats, then printed seven yards of fabric. The fabric was a cotton sateen with a 30” repeat using textile inks.

The facilities were wonderful, with very long print tables: 30” high, 68” and 72” wide and 20 yards long!


The first thing we learned was what types of marks and masks were opaque when transferred to the light sensitive screen. Various markers and black papers were
considered.


The first challenge was coming up a design. This was a lesson in team building. Each person came up with some marks or shapes that were then laid on top of the paper that is transparent in the printing process. The loose pieces of black paper were taped to the base with transparent tape.


After getting the arrangement we liked, a “jog” line was cut through the white spaces down the center of the design. The outside edges of the design were then put together so that the straight edges were now in the center, with gaps that needed to be filled in with more shapes and marks. The irregular edges that the jog line created on the sides ensures that the repeat would be less noticeable when the fabric is printed. Finally, everything was taped in place.


The design was placed on top of a prepared screen with a photo-sensitive emulsion and brought to a separate room housing the light table. The table was equipped with a vacuum that ensured the design was flat and would not move around during exposure to the light.


After exposure, the screen was brought to a large sink and the photo emulsion was removed from the areas opaque to the light by spraying with a hose.


The tables were equipped with rails with stops. The screens had L brackets that registered against each stop. Each stop was positioned precisely 30” apart in order to ensure the proper repeat.

Our next decision was color. We chose a medium blue as our main print color and also some other colors for accents. We used gold, a maroon red, some greens and lighter blues. These were dispensed from squeeze bottles, dripping them onto the screen before the main color was placed in the well at the top of the screen.


Printing was a two person job. The squeegee was pushed across to the center by the first person, then pulled the rest of the way by someone on the other side of the table. Every other stop was printed so that the no stray ink was picked up on the screen to mar the design. Every person had a hand in each print, either squirting the ink on the screen or taking turns pushing or pulling the squeegee.


Large fans dried the ink, then the rest of the repeats were completed.


At the end of the day each took home one yard of our originally designed fabric, with our names printed on the selvage! It was a great fun and a good learning experience. Who will be the first to cut up their precious fabric?


Our Latest Artist Interview has Dropped


Learn all about Deborah Weir and her work.  Click here to go to interview on our website.